Customizing your
Terminal
Customizing your Terminal
- bashrc and bash_profile
- Modifying your prompt
- Aliases
- Environment variables
- Paths
You should customize your shell according to your needs!
bashrc and bash_profile
bashrc: Initializes an interactive sessionbash_profile: Executed once when starting shell
But most of the settings go in bashrc file!
In Mac OSX, both files exist. In Linux, only one is used!
bashrc and bash_profile
A typical bashrc file looks like this:
https://gist.github.com/giggio/1704664
                        # ~/.bashrc: executed by bash(1) for non-login shells.
                        # see /usr/share/doc/bash/examples/startup-files (in the package bash-doc)
                        # for examples

                        # If not running interactively, don't do anything
                        case $- in
                            *i*) ;;
                              *) return;;
                        esac

                        # don't put duplicate lines or lines starting with space in the history.
                        # See bash(1) for more options
                        HISTCONTROL=ignoreboth

                        # append to the history file, don't overwrite it
                        shopt -s histappend

                        # for setting history length see HISTSIZE and HISTFILESIZE in bash(1)
                        HISTSIZE=1000
                        HISTFILESIZE=2000

                        # check the window size after each command and, if necessary,
                        # update the values of LINES and COLUMNS.
                        shopt -s checkwinsize

                        # If set, the pattern "**" used in a pathname expansion context will
                        # match all files and zero or more directories and subdirectories.
                        #shopt -s globstar

                        # make less more friendly for non-text input files, see lesspipe(1)
                        [ -x /usr/bin/lesspipe ] && eval "$(SHELL=/bin/sh lesspipe)"

                        # set variable identifying the chroot you work in (used in the prompt below)
                        if [ -z "${debian_chroot:-}" ] && [ -r /etc/debian_chroot ]; then
                            debian_chroot=$(cat /etc/debian_chroot)
                        fi

                        # set a fancy prompt (non-color, unless we know we "want" color)
                        case "$TERM" in
                            xterm-color) color_prompt=yes;;
                        esac

                        # uncomment for a colored prompt, if the terminal has the capability; turned
                        # off by default to not distract the user: the focus in a terminal window
                        # should be on the output of commands, not on the prompt
                        #force_color_prompt=yes

                        if [ -n "$force_color_prompt" ]; then
                            if [ -x /usr/bin/tput ] && tput setaf 1 >&/dev/null; then
                            # We have color support; assume it's compliant with Ecma-48
                            # (ISO/IEC-6429). (Lack of such support is extremely rare, and such
                            # a case would tend to support setf rather than setaf.)
                            color_prompt=yes
                            else
                            color_prompt=
                            fi
                        fi
You can use these files to customize how your shell session behaves, as well adding new environment variables!
Setting up your SHELL session
Modifying your prompt
- Open the terminal and type:
nano ~/.bashrc. (If it doesn't exist, create it withtouch.)
                        parse_git_branch() {
                            git branch 2> /dev/null | sed -e '/^[^*]/d' -e 's/* \(.*\)/ (\1)/'
                        }

                        export PS1="\[\033[36m\]\u\[\033[m\]@\[\033[32m\]\h:\[\033[33;1m\]\w\[\033[m\]\$(parse_git_branch)\[\033[00m\] "
                        export CLICOLOR=1
                        export LSCOLORS=ExFxBxDxCxegedabagacad
                        alias ls='ls -GFh'
- Hit Control+O to save, then Control+X to exit out of nano
Modifying your prompt
- This function extracts the current git branch.
                        parse_git_branch() {
                            git branch 2> /dev/null | sed -e '/^[^*]/d' -e 's/* \(.*\)/ (\1)/'
                        }
Modifying your prompt
- Changes the bash prompt to be colorized, and rearranges the print to
be
username@hostname:cwd $(git-branch)
export PS1="\[\033[36m\]\u\[\033[m\]@\[\033[32m\]\h:\[\033[33;1m\]\w\[\033[m\]\$(parse_git_branch)\[\033[00m\] "
Modifying your prompt
- The next two lines enable command line colors, and define colors for the
'ls'command
                        export CLICOLOR=1
                        export LSCOLORS=ExFxBxDxCxegedabagacad
Modifying your prompt
-G: Colorizes output-h: Makes sizes human readable-F: Throws a '/' after a directory, '*' after an executable, and a '@' after a symlink
alias ls='ls -GFh'
Modifying your prompt
You can also modify the aspect of
your command prompt
username@hostname:/path/to/working/directory (git-status)
You can add this to bashrc file!
Modifying your prompt
2018 - Fall Bridge Computational BootcampRepository
Under data >> day_03 >> dot_files
These are a set of sample dot files that you can add to your main directory.
Modifying your prompt
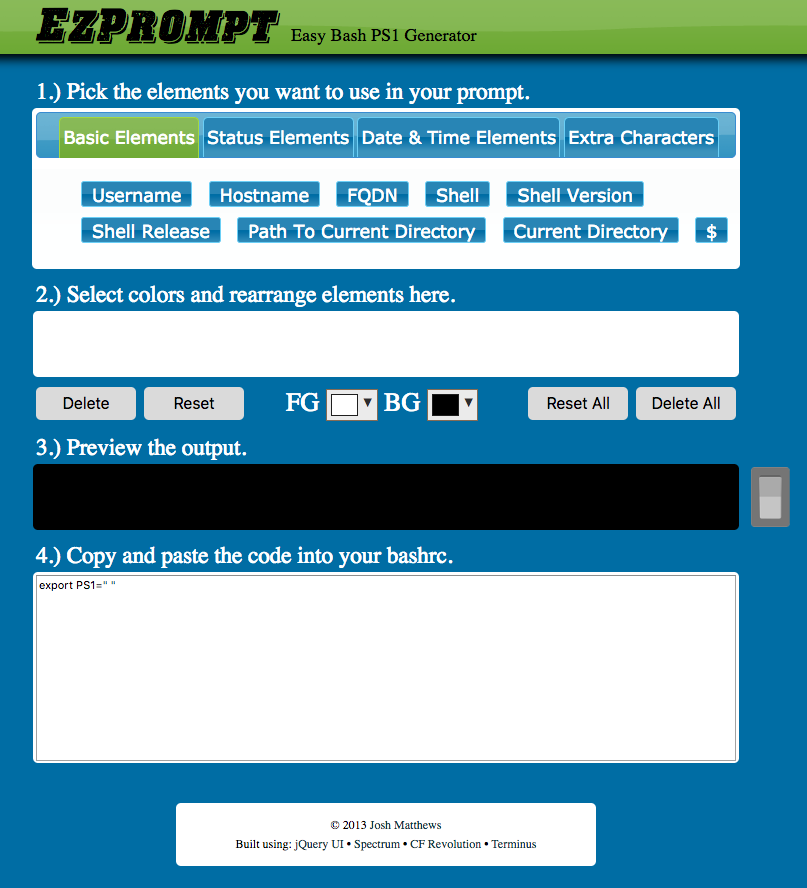
Or you can use
http://ezprompt.net/to also customize your prompt:
Aliases
- Keyboard shortcuts!
- For simple and complex commands
- Temporary or permanent
- Used to navigate your terminal
- etc.
Aliases
I like to save my aliases in ~/.aliases
                        ############################## --- GENERAL --- ################################
                        alias   lll='ls -lah'
                        alias   LLL=lll
                        alias   lla=lll
                        alias   llh='ls -lh'
                        alias   llt='ls -lahtr'
                        alias    LS='ls'
                        alias    sl='ls'
... and many more
Creating aliases
Creating aliases
If you want a temporary alias, type
alias name_of_alias="command"
For example:
alias ll="ls -al"
Now whenever you type ll, the system will understand it as ls -la
Creating aliases
If you want a permanent alias, you need to modify your ~/.bashrc file
                        ## Example of other aliases
                        alias pushd='cd -'
                        alias    CD='cd'
                        alias tree='tree -C'
                        alias crone='crontab -e'
                        alias cronl='crontab -l'
                        alias     jb='jupyter notebook'
This file is a compilation of useful aliases for your terminal!
(See the repository)
Removing aliases
If you want to remove an alias, type:
unalias command_name
This will remove the alias from the current session!
For example:
                        # This will remove the 'crone' alias
                        unalias crone
If you want remove a permanent alias, you will need to edit your ~/.aliases file!
Aliases
Whenever you modify your ~/.aliases file, you need to source it again:
source ~/.aliases
This will update the aliases in your current session
Exercise
- Create a temporary alias for
"ping www.google.com" - Add the aliases from the
.aliasesfile from the repository to your local version - Go to https://tinyurl.com/bcb18-repo
- Make sure you're in the "
master" branch - Copy the aliases in the
.aliasesfile to your.aliasesfile in$HOMEdirectory.
Aliases
For more info on aliases and how to use them,
see:
Environment variables
Environment variables
- When the shell session starts, the system compiles info that should be available to the shell session.
- Key-value pairs
- Temporary or permanent
Typically, environment variables look like:
KEY="value with spaces"
or
KEY=value1:value2:...
Creating environment variables
Creating a variable named TEST_VAR
TEST_VAR='Hello World!'
And you can access it by:
echo $TEST_VAR
Now you need to export the variable
export TEST_VAR
This will ensure that your variable TEST_VAR
is available!
Using environment variables
You can set environment variables in your current shell, or you can make them permanent
You can do this adding them to your ~/.bashrc file
                        ## .bashrc file
                        ...
                        # Defining environment variable TEST_VAR
                        TEST_VAR='Hello World!'
                        export TEST_VAR
                        ...
and type this in the terminal
source ~/.bashrc
This will source the new environment variables!
Environment Variables
For more information on environment variables,
see:
Putting it all together ...
You learned how to
- Customize the way your terminal prompt looks
- Edit your
~/.bashrcfile - Work with
aliases - Set environment variables
Now you can add/modify your environment. You can use the dot files found at:
(Note: Make sure you're in the master branch!)
Back to main website: